The free EZ-Maaser mobile app is the easiest way to keep track of your maaser (or chomesh) giving!
Introduction
It is a widely accepted practice among observant Jews to donate to tzedaka (charity) 10% (or 20%) of all their income/profit. This is called giving "maaser" or "meiser" ("tithe" in English), based on the Hebrew root for "ten" or "one-tenth".
Besides the tremendous chesed (lovingkindness) involved in giving so much tzedaka, Hashem (G-d) promises that one who gives maaser will be rewarded with material prosperity in this world (in addition to the eternal reward one receives in the Next World).
EZ-Maaser is an app that makes it very easy and convenient to track your income, donations and relevant expenses, so that you can make sure you are consistently giving exactly 10% (or 20%) of your income/profit to tzedaka.
About Maaser & Chomesh
About Giving Maaser
It is written in the Shulchan Aruch, Laws of Charity (Yoreh De’ah 249:1), that a person should "...give up to one-fifth of his assets [profits] – this is the optimal fulfillment of the mitzvah; one-tenth is a moderate measure; less than this is considered miserly."
Rabbinic authorities disagree whether giving maaser (10%) of one's monetary earnings (profits) to charity is a Torah obligation (as is giving 10% of one's harvested produce), a Rabbinic obligation (based on the Torah maaser law of produce) or a worthy custom that has been widely accepted by the Jewish nation over the generations. Most authorities hold the third opinion: that it is a good and important practice, but not an obligation. (Note that it is a Torah obligation incumbent on all, even a destitute person, to give at least a little tzedaka to the poor every year.)
In any case, all agree that giving maaser is a very praiseworthy practice, with powerful benefits, both in this world and the Next World. The Torah promises explicitly that one who gives maaser will become financially wealthy: The Gemara explains that the double word form used in the commandment, "tithe you shall tithe" in Devarim (Deuteronomy) 14:22 is conveying G-d's promise that you should "give maaser so that you shall become wealthy."
The Chafetz Chaim (in Ahavat Chesed) quotes from Sefer Hakarnayim that the heavens are sustained in the merit of maaser, and they shower blessing onto one who donates one tenth of his income.
And, while it is generally prohibited to "test" Hashem by performing a mitzvah (commandment) to await the reward (see Devarim 6:16), testing whether Hashem will give one wealth (financial wealth, specifically) in reward for giving maaser is permitted. (See Malachi 3:10, Talmud Bavli Taanit 8b, and Ahavat Chesed 2:2:7.)
The earliest sources for giving 10% of one's profits to charity are in Bereshit (Genesis): Avraham Avinu (Abraham) donates 10% of the spoils of war (Bereshit 14:20), while Yaakov Avinu (Jacob) declares: "And all that You will give me, I shall surely tithe for You." (Bereshit 28:22). Following this, we see that Yaakov became extremely wealthy: "And the man became exceedingly prosperous, and came to own large flocks, etc." (Bereshit 30:43).
Key Guidelines for Giving Maaser
Note: The following brief overview of the halachot (laws) of giving maaser are not necessarily universally accepted by all halachic (Jewish legal) authorities; readers are encouraged to consult their own rabbinic authority if any questions arise.
- Exactly 10%: One should be careful to separate precisely 10% of one's net income and give it to worthy beneficiaries. Even if one chooses to give more than 10% (for example, to give chomesh, as mentioned in the next section), one should state that exactly 10% is being given as maaser and then give the rest as additional charity (in the case of chomesh, as a second maaser). This is because there are deep spiritual concepts underlying the exact separation of 10%.
- All income and profits: One should give maaser on all net earnings, income and other forms of realized profit. This includes gains, such as monetary gifts, inheritance (even if the person who bequeathed the inheritance already gave maaser on this money), securities sold at a profit, (permitted) interest, monetary lotteries/raffles, and found money.
- Deductible expenses: One should give maaser on the net income (i.e., actual realized profit), not the gross income/earnings. This means that all expenses directly incurred to generate the income should be deducted from the gross earnings to determine the net income/profit upon which the 10% is calculated. According to most authorities, valid deductions include direct work-related expenditures, such as transportation to/from work, necessary clothes or tools or other items purchased for work, babysitting expenses so that one can go to work, direct business costs (e.g., office utility bills, employee wages, insurance), cost of goods/securities, and any other expenses necessary to generate the income. Accordingly, all income taxes and capital gains taxes should also be deducted from income before calculating the 10%.
- Non-deductible expenses: According to most authorities, most personal, household and living expenses should not be deducted from the gross income before calculating maaser. This includes food, household items, sales tax paid on personal purchases, supporting/educating one's non-adult children, etc. In some cases, one may deduct certain types of non-obligatory mitzvah- or chinuch-related expenses (such as additional expenses in these areas beyond the necessary minimum).
- Timing: Some authorities say that one should pay all maaser/chomesh owed by Rosh Hashana of every year, at the latest, while others say that one may choose any date in the year as an annual payment deadline (e.g., December 31). Many people who give maaser/chomesh do so throughout the year, and keep a rolling record of how much they owe (or have prepaid).
- Prepaying maaser: According to most authorities, it is permitted to "prepay" maaser, i.e., to give more than is currently owed in expectation of future income. When doing so, one should still be careful to stipulate the exact 10% one is giving.
- Tzedaka priorities: The priority rankings among different charitable options (e.g., members of your family, poor people in your city, poor people in Israel, Torah scholars, communal needs) is beyond the scope of this brief summary; the reader is encouraged to investigate this important topic.
About Chomesh
As opposed to giving maaser of 10%, the word chomesh means giving 20% (from the Hebrew root of five, or one-fifth).
According to Torah law regarding harvested produce, one is actually obligated to give two different maaser contributions: maaser rishon (given to Levi'im) and either maaser sheni (which is either taken to Jerusalem or redeemed) or maaser ani (which is given to the poor in certain years instead of maaser sheni). Since the obligation or custom to give maaser is based on maaser of produce, it is learned that ideally one should actually give maaser twice, which equals 20% of one's net income.
While not obligatory, giving 20% of one's net income (twice maaser) is considered by some authorities the ultimate way to give maaser. Four noteworthy examples are the Shulchan Aruch quoted above (Yoreh De’ah 249:1), the Rambam (Mishna Torah: Laws of Gifts to the Poor 7:5), the Vilna Gaon (quoted in Sefer Shaarei Rachamim 45), and the Chafetz Chaim (Ahavat Chesed 2:19:3).
Many people who are meticulous to give chomesh report open miracles in the Divine financial assistance that they receive.
EZ-Maaser User Guide
User Guide Table of Contents
Getting Started
The first time you start the app, you can choose the currency you use and whether you give maaser (10%) or
chomesh (20%) of your net income. You can change these settings at any time in the Settings screen (if you
change the maaser/chomesh setting, the calculations will be redone accordingly).
Also, the first time you start the app, you can choose to see some demo data, to help you understand what using
the app is like. If you chose this option the first time you started the app, you can erase all that demo data
(so that you can begin entering your own activity data) by navigating to the Settings screen (via the main menu
at the top left) and selecting Delete All Data (from the three-dots menu at the top
right).
The Main Screen
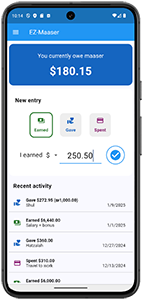
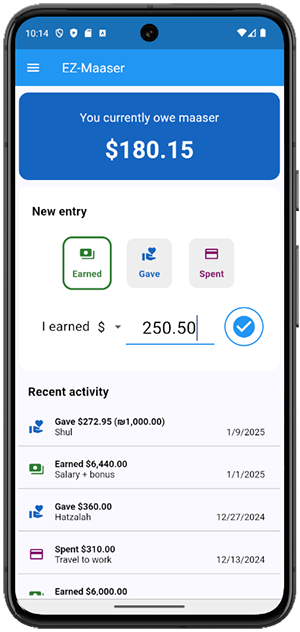
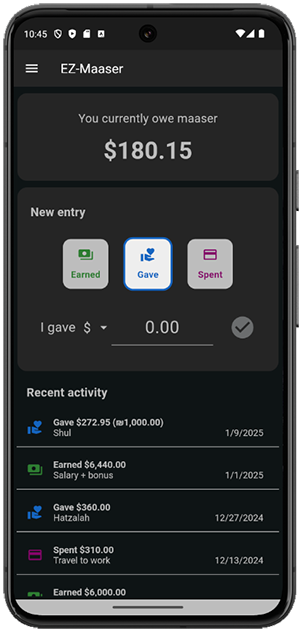
The main screen is divided into three sections:
- Top: Displays your current balance (how much maaser/chomesh you owe or have prepaid)
- Middle: Used to record your activity
- Bottom: Displays a few of your most recent activities.
- Tap an activity to open a context menu with four options: Edit, Duplicate, Recur and Delete.
- Tap See all activity at the end of the list to open the Activity screen,
where you can review all your activities, sort and filter the activity list, and more. (The See all
activity option only appears if you have many activities.)
Recording an Activity
Tap one of the three large buttons on the main screen to record an activity, one of:
- Earned: Income you received
- Gave: Charity you gave
- Spent: Business expenditures, taxes or other deductions you paid in order to generate your income
– these amounts are deducted from your amount Earned in order to reduce the amount of actual (net)
income on which your maaser/chomesh is calculated. Important note: If the Earned amounts you entered
in the app have already been reduced by expenses, taxes, etc., then do not enter those amounts again as
Spent.
Enter the amount you earned, gave or spent, and then tap the blue arrow to the right of the amount.
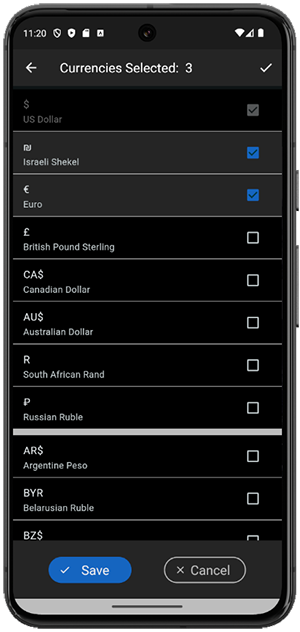
If you want to enter an activity amount using a currency other than your primary currency, tap the currency
symbol next to the amount box and select an alternative currency. If the currency you want to use does not
appear in the drop-down list, tap + and then select any additional currencies you would like to use. You can
also manage all the currencies you want to use in the Settings screen.
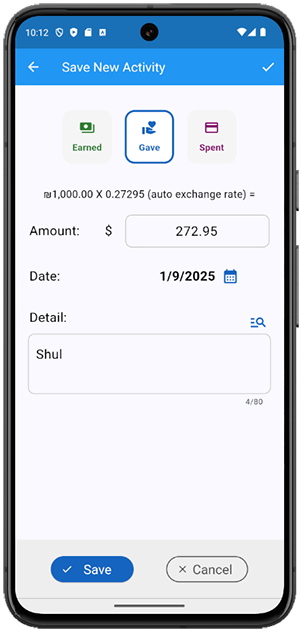
In the next screen, you can:
- Adjust the date for the activity – this is useful if the activity did not occur on the day you
are entering it.
- Enter a description of the activity in the Detail field – for example, the source of the
income, to which charity you gave, or what kind of expense you are recording.
- When you tap the Detail field, a list of previous Detail entries will appear above it, starting with
the most recent ones. You can tap one of these entries to use it again without having to retype it.
- When the list of previous Detail entries is visible, typing in the Detail field will filter the list
to only show previous entries that contain the text you have typed.
- You can close the list of previous Detail entries by tapping the X next to the bottom of the list.
To re-open the list, tap the blue icon in that same location.
- Check the Schedule automatic recurrence checkbox if would like to set up a schedule for this activity to recur (repeat) automatically.
When you are done, tap Save (or the checkmark at the top-right of the screen) and the activity will be applied to
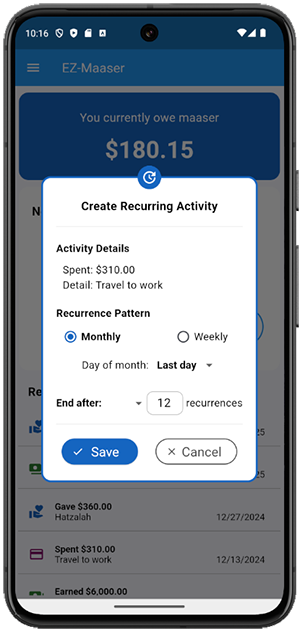
your maaser/chomesh record. If you checked the automatic recurrence checkbox, the Create Recurring Activity dialog will appear.
Reviewing and Editing Activities
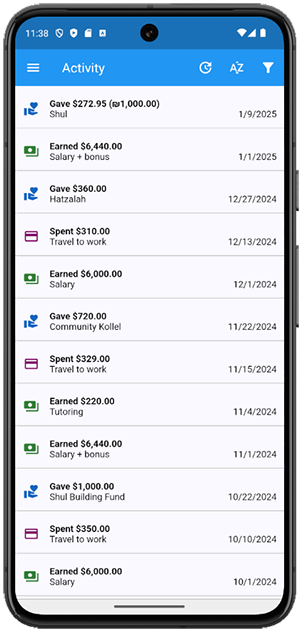
Review the activities you recorded by navigating to the Activity screen via the main menu. Here, you may also:
- Edit an activity's details: Tap an activity and select Edit. Make any desired
changes and tap Save.
- Duplicate an activity: Tap an activity and select Duplicate. This is an easy
way to create a new activity using most of the details of an existing activity (the current date is set for
the new, duplicated activity).
- Set an activity to recur automatically: Tap an activity and select Recur. Set the
recurrence pattern (and, optionally, an end date or number of recurrences) and tap Save. Read more about
this here.
- Delete an activity: Tap an activity and select Delete.
- Sort the activity list: Tap the A-Z icon at the top of the screen to open the Sort
dialog and then make your sort selection there. Tap the Reset button in the dialog to return to the default
sort order (date, descending).
- Filter the activity list: Tap the funnel icon at the top of screen to open the
Filter dialog and then make your filter selections there. Tap the Reset button in the dialog to return to
remove all filters.
- When a filter is active, the funnel icon at the top of the screen will be green, and a summary card
of the activities included in the current filter (Earned, Given and Spent) will usually appear at the top of the list.
- When only the Date filter is applied, the summary card will also include a note about how much
maaser/chomesh was due and given during the selected period, such as a particular year (this is useful, for example, if you want to check if the amount of maaser/chomesh you gave in a particular period met your expectations). Note that you can also see this information for a particular year in the Summary screen.
Automatically Recurring Activities
You can set up activities to automatically recur (repeat) on a monthly or weekly basis. For example, if your
salary is the same amount on/around the 10th day of every month, you can set it up to be added
automatically to your Activities every month on the 10th. Likewise, if you have a recurring donation or expense
in a fixed amount every month or every week, you can set those up as automatically recurring activities.
To create a recurring activity, tap on any existing activity (in either the Main screen or Activity screen) and
tap Recur, or check the Schedule automatic recurrence checkbox when recording a new activity. Select your desired recurrence options and tap Save. From now on, the activity will automatically
recur accordingly.
You can place a limit on how long a recurring activity will remain active, either by setting an end-by date or by
specifying the total number of recurrences. Once the limit is reached, the recurring activity definition will
automatically be deleted.
Notes about recurring activities:
- Activities created automatically according to a recurrence pattern appear with a different icon.
- To review the recurring activities that you have defined, tap the Recurring icon at the top of the Activities
screen. To change the recurrence pattern of a recurring activity definition, tap it, tap Edit and then make your
desired changes. To delete a recurring activity, tap it and then tap Delete.
- You cannot change the amount or detail information for a recurring activity definition. If you need to
change these, delete the existing recurring activity definition and then create a new recurring activity definition.
- You can edit the details of any activity that was created automatically, just as you edit any other existing
activity.
- A newly created recurring activity definition will never generate a new activity on the day it was created.
- You cannot create a recurring activity definition from an activity with a future date.
- You can see the number of times that each recurring activity definition was used to generate a new activity, the next scheduled recurrence date and other details by tapping the Recurring icon at the top of the Activity screen.
- If a recurring activity uses an alternative currency and the correct exchange rate could not be retrieved at
the time that the activity was created (this should only happen when a reliable Internet connection is not
available), the app will keep trying to fetch the exchange rate for a period of time (hoping that Internet
connectivity is restored). At any time, you may also edit that activity to manually enter the correct
amount.
Using Multiple Currencies
Your Primary Currency
If you earn money and/or make donations in more than one currency, EZ-Maaser makes it easy for you to enter
activities in multiple currencies. Your selected primary currency will serve as the basis for tracking your
earning and giving; whenever you enter an activity using a different currency, EZ-Maaser will convert the amount
in that currency to an equivalent amount in your primary currency. You can change your primary currency in the
Settings screen.
Automatic Exchange Rates
When you enter a new activity in an alternative currency, the app will retrieve the relevant exchange rate for
the activity's specified date. (EZ-Maaser obtains exchange rates from a third-party financial data provider used
by some of the world's largest companies.) If you prefer to use a different exchange rate than the one generated
by the app, you may manually adjust the activity amount (which is always in your primary currency) as you wish.
Note that, besides standard fiat currencies, EZ-Maaser also supports using a variety of cryptocurrencies.
Exchange Rate for Changed Activity Date
If, while editing an existing activity that was initially recorded using an alternative currency, you change the
date of the activity, EZ-Maaser will retrieve the correct exchange rate for the new date and recalculate the
activity amount for your primary currency.
Changing your Additional Currencies
You can add and remove the additional currencies you want to use at any time, in the Settings screen. You may also do this by tapping the currency symbol next to the amount
box on the Main screen and then selecting your desired currency on the Currencies screen.
Changing your Primary Currency
If you need to change your primary currency (e.g., if you move from one country to another), you can make a note
of your current maaser/chomesh balance, delete all activity data in the app (see Delete All
Data), select a new primary currency, and then enter an initial "carry-over" activity in the new
currency that results in an equivalent value to your old balance.
Your Summary
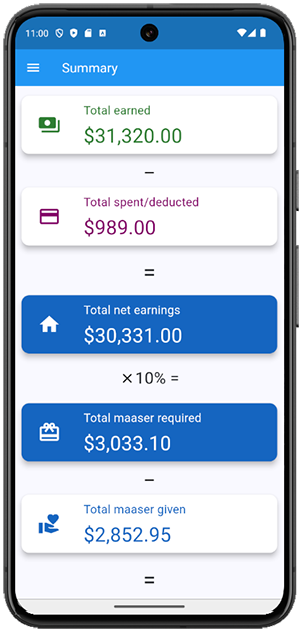
To see an overview of your activity, what percentage of your net income you have actually given to maaser/chomesh, and
how your maaser/chomesh balance is calculated, use the main menu to navigate to the Summary screen. At the top of the screen you can select what period of time to review:
- All time – covers all the data you have in the app
- Jewish year – includes all activity from one Rosh Hashana to the next
- Secular year – includes all activity for one secular calendar year
If you choose to close out your maaser/chomesh account once a year, the year-based options make it easy to see how you are tracking towards your goal throughout the year.
Settings & Data
Navigate to the Settings & Data screen to adjust the following settings:
- Change the language of the app's user interface.
- Change whether you give maaser (10%) or chomesh (20%).
- Set your preferred date format, if you want it to be different from your device's system date format.
- Set your preferred visual theme: Light, Dark or match the current device System setting.
- For privacy, you can lock the app until you open it with a PIN code of your choice, or using
biometrics (fingerprint or face recognition, if set up on your device). Note that there is no way to
retrieve a forgotten PIN code, so make sure to remember it, if you choose this option.
- Set your primary currency.
- This cannot be changed when there is any activity data already in the app.
- If you need to change your primary currency (e.g., if you move from one country to another), you can
make a note of your current maaser/chomesh balance, delete all activity data in the app (see Delete All Data), select a new primary currency and then enter an initial
"carry-over" activity in the new currency that results in an equivalent value to your old balance.
- Select one or more additional currencies. For details, see Using Multiple
Currencies.
- Restore the appearance of all pop-up tips. The Restore pop-up tips menu option will appear in the three-dots menu at the top-right of the screen if you previously selected the "Don't show this message again" option in any of them.
You can also manage your activity data in this screen:
- Delete All Data: To start fresh, select Delete All Data from the three-dots
menu at the top right. This option only appears when activity data exists in the app.
- Load Demo Data: To explore the app before using it with your own data, select
Load Demo Data from the three-dots menu at the top right. When you are ready to begin entering your own
activity data, select Delete All Data. This option only appears when no activity data exists in the app.
- Export to CSV file: To create a CSV file containing all of the activity data held
in the app, tap the Export to CSV File button.
- CSV is a standard file format for data tables; CSV files can be opened and edited in spreadsheet
applications (such as Microsoft Excel and Google Sheets).
- You can share your exported data file via any Share options available on your device
(e.g., email, WhatsApp). To share the file, tap the Share File button.
- You may also save the file to your device or cloud account; to do so, tap the Save File button. Note: Not all devices will allow the saving of the file to the device; if this function does not work for you, use the Share option instead.
- Exported CSV files are saved using UTF-8 encoding. If your data contains non-English characters
(e.g., Hebrew), then you may need to open the file by specifying the correct encoding (e.g., in
Excel, use the "Get Data From Text" command and select the "65001: Unicode (UTF-8)" character
encoding).
- Import from CSV file: To add activity data into the app, you can prepare a CSV
file and import its contents into the app by tapping the Import button.
- After tapping the Import button, tap Select file in order to choose a CSV file that you have
previously saved to your device storage, and then tap the Import button. Detailed information about
the success or failure of the import operation will be displayed.
- To ensure that the import operation is successful, it is important to prepare the CSV file according
to the following guidelines:
(1) The file must be a text file that adheres to the rules of standard CSV files.
(2) The first line of the file must contain these four comma-separated field names:
Date,Type,Amount,Detail.
(3) Each subsequent line in the file must contain four valid corresponding comma-separated values:
(a) Date, formatted either according to your selected date format in the app's Settings
screen or to your device locale/region/settings; (b) Type is one of Earned, Gave, Spent; (c) Amount
is a valid number (both a period and locale-specific decimal separators are supported); (d) Detail
is
plain text (optional).
(4) If the file contains any non-English characters (e.g., Hebrew), it must be saved using UTF-8
encoding.
- The easiest way to see what a valid import file looks like is to export data from the app (see
above) and then match the file format you see there.
- Back up your data: You can save a cloud backup of all your activity data and app settings by logging into a Google or Apple account. Having a backup allows you to recover your data in the event that your device is lost or disabled. You can also use a cloud backup to transfer your data and settings to a different device at any time by using Restore on that other device.
- Tap the Back Up My Data button to immediately create a one-time cloud backup.
- Once you are logged in to a cloud account, you can set Automatic backups to Enabled. Enabling this setting will frequently back up your data and settings to the cloud in the background, as long as your cloud account login remains active and your device is connected to the Internet.
- The date of your latest backup appears at the bottom of this screen, if one exists.
- If you wish to delete the cloud backup for any reason, tap the Delete backup link at the bottom of this screen.
Notes:
- Your backup data is encrypted in transit and at rest on the cloud server, and contains no personal
information beyond your cloud login ID.
- Along with your activity data, all settings are backed up and restored except for UI language and app lock (PIN/biometrics).
- The developers of EZ-Maaser take no responsibility for any loss of data that may occur for any
reason. The backup feature is provided "as is" without any warranty, for the convenience of the
user. It is highly recommended that, in addition to using the Backup feature, you also maintain a
recent copy of your data by using the Export to CSV feature, to send a copy of
your data to an email account or other external location.
- Restore your data: You can restore data from a cloud backup on any device that is logged into the same account with which a backup was previously made.
- Important note: Performing a restore will erase and replace all EZ-Maaser data currently on the device, so use with care.
- If you wish to copy data from one device to another without deleting the existing EZ-Maaser data on the destination device, you should use the app's Export to CSV and Import from CSV features instead.
The Premium Version
All of the core functionality of the EZ-Maaser app is completely free to use (and the app contains no
advertising). However, there are a number of advanced features mentioned above that are only available in the
Premium version of the app:
- Create automatically recurring activities (monthly/weekly).
- Enter activities in multiple currencies (including automatic exchange rates).
- Sort activities in the Activity screen.
- Filter activities in the Activity screen.
- Import activity data from a CSV file.
- Export activity data to a CSV file (for backup, analysis, etc.).
- Automatic background backups of your activity data and app settings using a cloud server.
You can purchase the premium version through the Google Play Store (in Android) or the Apple App Store (in iOS)
using one of the Upgrade to Premium buttons in the app's Premium screen: You can choose to subscribe on an
annual basis, or make a one-time "forever" purchase.
Note: Premium version registration is per Google/Apple account. When you get a new device, your Premium registration can be activated on the new device using the Restore Purchase button in the Get Premium screen. Keep your Google/Apple order number in case the Restore Purchase button doesn't work and you need to contact us to move your Premium status to a new device at a later time.
Data Privacy
The EZ-Maaser app saves all of your activity data on your physical device, not a cloud server. The app does not require any personally identifiable information (PII), such as your name or email address. However, if you choose to use the app's cloud backup feature, then you will have to provide your Google or Apple login details, and an encrypted copy of your activity data will be saved to a cloud server. The app generates anonymous usage data for the purposes of improving the product (e.g., non-PII usage reporting and analytics). If you use the app's Export to CSV feature, responsibility for the privacy and protection of the exported data is yours alone. Further details can be found in our Privacy Policy.
Frequently Asked Questions (FAQs)
What if I want to give 8% or 12% or 15% of my income to charity?
Even among those who already give maaser, many people don't realize that an important spiritual aspect of giving maaser on income is to calculate and give exactly 10% of their net income. (And one who gives chomesh should stipulate that he is giving maaser and another maaser, which equals 20%.) It is certainly praiseworthy to give more than 10% (though it is not permitted to give more than 20% in many situations), but in this case one should be careful to give exactly 10% to maaser and explicitly state/intend that what he gives beyond that amount is regular charity, but not maaser.
EZ-Maaser's Summary screen shows you exactly what percentage of your net income you have given in a particular Jewish or secular year (or for all the time you have been using the app). So, if you choose to give some percentage other than 10% or 20%, you can use this screen to track that you remain on your desired target over time or for a particular year.
Is there a fast way to enter repeating activities?
Yes, there are two ways to do this. If you only want a fast way to manually repeat an existing activity once in a while, tap an existing activity and select Duplicate. All of the new activity's details will be the same as the original one, except that the current date will be set for it.
You can also define an automatically recurring activity when creating a new activity or by tapping any existing activity (in the Main or Activity screens) and selecting Recur – this will allow you to set an automatically repeating schedule, on a monthly or weekly basis.
Can I include in my maaser/chomesh balance a series of planned future donations?
If you to prefer to calculate all the months of a series of donations in advance, as if the entire amount has already been donated, enter one activity at the beginning (or end) of the period (such as "Yeshiva all of 2026") and enter the total annual amount (for example, $1,200 for a monthly donation of $100 for one year). Note that even if you enter a future date for this activity (such as the date of the final payment in the series), once it is recorded in the app, the total amount will immediately be reflected in your maaser/chomesh balance.
How can I track my earning and giving for more than one currency, separately?
EZ-Maaser contains a rich set of features to make it easy to track your earning, giving and spending occurring in multiple currencies. The app's approach is to automatically convert all transactions into your primary currency and maintain a single maaser (or chomesh) balance. Note that, for each activity, the app stores and displays the original currency, original currency amount, and exchange rate used on the activity's date.
If you specifically want to keep completely separate records of your earning and giving in two different currencies, your best bet would be to run EZ-Maaser on two different devices (e.g., your phone and your tablet, or your phone and your spouse's phone). In each one, you will choose a different primary currency and then use each device only to record activities in that currency.
How can I produce reports from my activity data in the app?
The Activities screen displays all your recorded activities, and allows you to sort and
filter the list as desired. When the list is filtered, a summary card appears at the top of the list with the totals
of the currently shown activities.
The Summary screen reports what percentage of your net income you have given to
maaser/chomesh during for a selected year (or for all recorded activities), and shows clearly how your
maaser/chomesh balance is calculated.
Generating more advanced reports than this is currently beyond the scope of the app, but here's how you can
address this need: use the app to easily record all of your maaser/chomesh-related activity and then use a
spreadsheet application (such as Excel or Google Sheets) to create any reports or graphs you wish. To get your
data into the spreadsheet, see Export to CSV File.
Can my spouse and I both make entries in the same maaser account?
The current version of EZ-Maaser stores all your data locally (i.e., on your device itself) and therefore one maaser ledger cannot be accessed from multiple devices. The advantages of this approach are better privacy protection (no personal data is stored in the cloud), more reliable performance (no dependency on Internet connectivity for the app's basic functions), and no need for you to log in before using the app. However, if enough people request this feature, we will certainly consider implementing it!
How can I copy my data from one device to another?
There are two ways to do this:
- Back up your data to the cloud using the app's Back Up Your Data feature and then use the app's Restore Your Data feature on the second device. Note that, upon Restore, this approach will erase/replace all activity data and settings on the destination device.
- Export your data to a file using the app's Export to CSV feature and then use the app's Import from CSV feature on the second device. This approach will not delete any data on the destination device, nor will it transfer the app settings.
If you don't need to copy all your activity data to the new device, but just the current maaser/chomesh balance, then you can transfer your current balance to a new device like this: Create an Earned activity on the new device named something like "Balance carryover" and enter the amount as 10X your maaser balance or 20X your chomesh balance. For example, if your current maaser balance is 150, create a carryover Earned activity in the amount of 1500.
What happens if I purchase the premium version and then upgrade/replace my phone?
The Purchase Premium screen in the app contains a Restore Purchase button. As long as you are logged in to the same Google or Apple account that you originally used to purchase the Premium version, this button will transfer your Premium purchase to your new device. If this is not possible (e.g., if the original purchase account is no longer available, or if you changed from Android to iOS or vice versa), then contact us using the Get Support button in the app's About screen and include your original Google or Apple order confirmation number and we will manually transfer your purchase to your new device.
Contact/Support/Feedback
We would be happy to receive your feedback, questions and suggestions via email to support@ez-maaser.com.
For technical support inquiries, we recommend using the Get Support button in the app's About screen.
To delete your cloud backup and/or account, see EZ-Maaser Data & Account Deletion.